
The purpose
This article describes the creation of a web application using Teachable Machine, Google’s AI model creation service.
The application will be trained using images captured by a PC’s camera and will react dynamically based on the PC camera’s input.
What Teachable Machine can do
Teachable Machine allows you to train AI models and create them for free. The AI input can be either images (specifically, regular images and poses) or audio data, and the output is a classification probability.
(The number of classifications doesn’t need to be limited to two.)
A simple example would be training a model with 100 images of cats and 100 images of dogs. Using the created model, you can input an image and it will output the probability of it being a dog and the probability of it being a cat. (The dog probability and cat probability will always add up to 1.)
Create a model
Access to Teachable Machine page.

Click either “Try it” (located in the middle or upper right of the page).
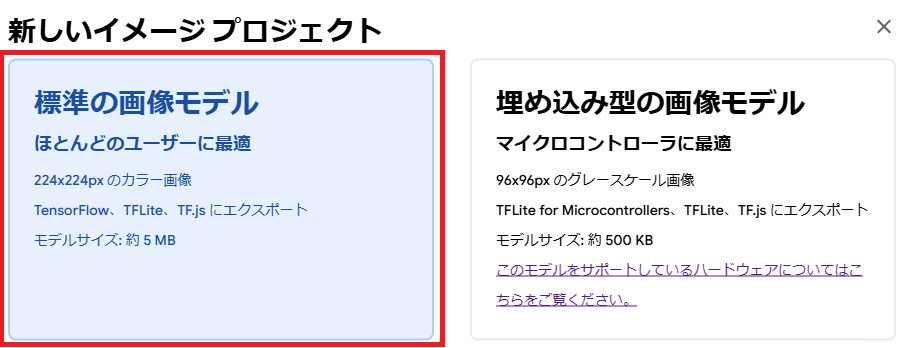
A new project page will appear; click “Image Project” on that page.

Please translate the following. Then select the 【standard image model】.
The model creation screen will appear. Click on the areas displaying “[Class1]” and “[Class2]” and rename them to the classes (groups) you want to distinguish.
Here, we’ve renamed Class1 to “Open” and Class2 to “Close”.

To prepare “Open” and “Close” teacher data, click the webcam “Open” button. (Your browser will ask for access to your camera; please allow it.)
After reviewing the preview and when ready, press and hold “Long press to record”. (Recording only occurs while you’re holding.)
Make sure to move around somewhat to avoid having only the same image repeatedly. You can click on the saved images displayed on the right to preview and delete them.
Once teacher data has been set for both classes, click the “Train Model” button on the right.
In my environment, it took about a minute to complete with approximately 200 teacher data images per class.
After completion, a preview will appear on the right. Please verify that the model correctly identifies the intended objects. If there are any problems, add more training data and retrain the model.
If there are no problems, click the “Export Model” button.
In the window that appears, click “Tensorflow.js” -> “Download” -> “Download Model” in sequence.
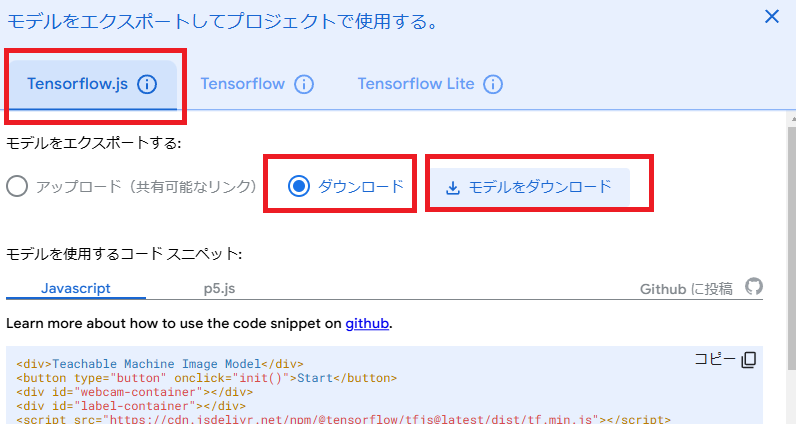
The file tm-my-image-model.zip will be saved.
Please do not close this tab, or save the code below to a notepad or similar application for later use. You can copy the code using the copy button in the upper right corner.
Create HTML file
Create HTML file
An index.html file was created in the working directory.
Its contents are as follows:
<!DOCTYPE html>
<html>
 <head>
  <meta charset="UTF-8">
  <title>Teachable Machine example</title>
</head>
 <body>


</body>
</html>
Copy model file
A folder named my_model will be created in the working directory.
The contents of the previously downloaded tm-my-image-model.zip (containing metadata.json, model.json, and weights.bin) will be extracted into this folder.
copy snippet
I copy the code displayed when I create a model.
I paste the copied code between the <body> and </body> tags of the created index.html.
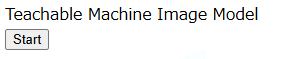
Opening index.html displays the following page.
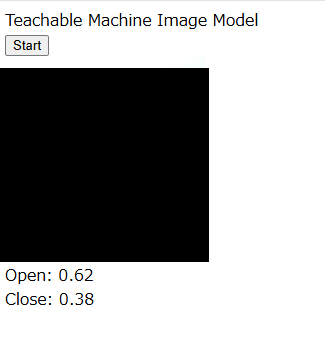
Pressing “Start” displays the camera image (a black area), the probability of “Open,” and the probability of “Close.”
When I run the index.html file as a local file (e.g., by double-clicking it or dragging and dropping it onto a browser), clicking “Start” results in the following error, preventing execution.

Please refer to the following article to start and run the server.

Result
We are able to create a web application that uses Teachable Machine to classify images.
コメント